
Zendesk
Setup
If you have not done so already, create your UserView account on https://userview.com/signup. There's a free trial available. You'll need to install the Upscope JavaScript code first.
Install and Use the Upscope App for Zendesk in 3 Steps
Please note that you must be signed into Zendesk and Upscope as an admin.
- In Upscope, go to
Settings»Integrationsand click onConnect to Zendeskto generate a Token. - Copy that Token and go to the Zendesk Marketplace.
- There's an Upscope app for support (tickets) and for chat. Choose the one you use and install the app. Enter the Token when prompted.
Zendesk Messaging
If you have Messaging enabled, you can enable authenticated visitors and set the uniqueId on Upscope:
<script>
  Upscope('updateConnection', {uniqueId: "YOUR_USER_ID"})
</script>
The value for uniqueId must be the same as the one you used for externalId when signing a new JWT token on Zendesk.
Please Note - for Zendesk Support (Tickets)
Connect Your Zendesk Account (OAuth)
After installing the app, you can optionally connect your Zendesk account via OAuth. This enables advanced features like automatic ticket tagging and session summary notes.
- In Upscope, go to
Settings»Integrationsand open your Zendesk integration. - Under the OAuth section, enter your Zendesk subdomain (e.g.
yourcompanyforyourcompany.zendesk.com). - Click
Connectand authorize Upscope in the Zendesk consent screen.
Once connected, you'll see a confirmation with your connected subdomain. Upscope requests read access to users and read/write access to tickets.
Tip
Ticket Tagging
When OAuth is connected, Upscope automatically tags Zendesk tickets with userview:cobrowsing whenever a co-browsing session ends. This lets you filter and report on tickets where co-browsing was used.
No configuration is needed — tagging happens automatically for any session linked to a Zendesk ticket.
Session Summary Notes
When OAuth is connected, Upscope can post a summary of each co-browsing session as a private internal note on the associated Zendesk ticket when the session ends.
The summary includes:
- Agent and visitor names
- Session duration
- Video recording link (if available)
- Audio/video call duration
- User and agent ratings and feedback
- Agent notes
Enable or Disable
- Go to
Settings»Integrationsand open your Zendesk integration. - Under Session summary, set the option to
YesorNo.
Session summary notes are enabled by default. The note is only visible to agents (not customers).
Please Note
zendesk_session_summary feature on your plan. If the option is disabled, contact support to check your plan's availability.Using the App
To confirm that Upscope is installed correctly:
- Run a test of the Upscope Zendesk integration by going onto your website and starting a chat.
- Within Zendesk, you'll see the Upscope
Screen sharingbutton appear on the right-hand side. Click that to start co-browsing.
You can not only scroll, click, and type for the user but also use the pen tool to draw on or around objects to bring the user's attention to them.
Tip
Use the Support Code When Users Phone In
You can also find the user by using their support code when they phone in. The phone support code is a 4-digit unique code which, on entry, leads you to that user's specific screen without them having to start a chat on Zendesk.
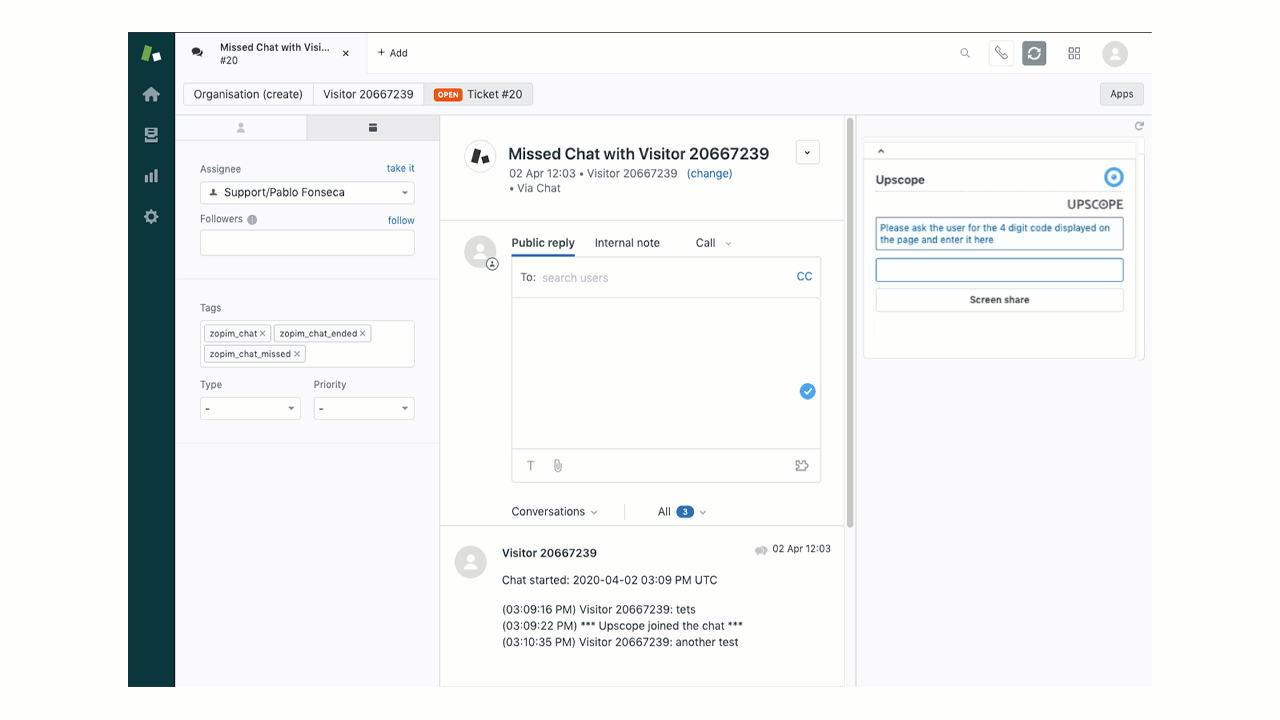
- Ask for their code (make sure you have it enabled here).
- Plug the code into the Upscope widget.
- Click the
Screen sharebutton.
Depending on your setup, it can either be pulled up by the user pressing control on their keyboard 5 times or it can also be displayed somewhere on the page. Find out more about the support code.